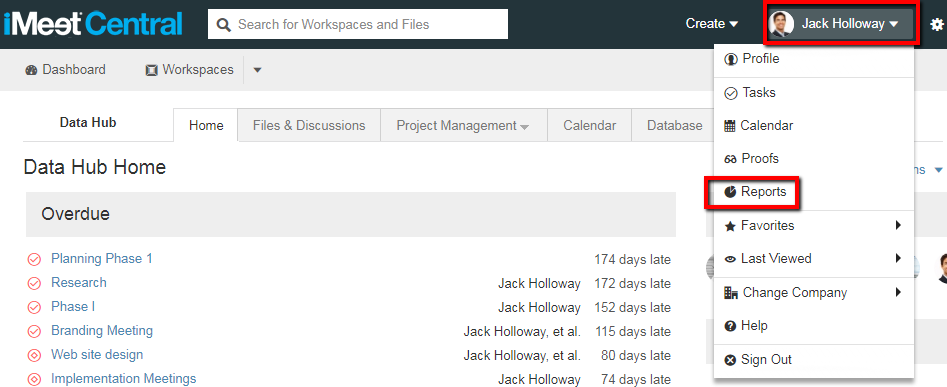
To access Reporting, navigate to the user drop-down menu (top right next to your name) and select Reports.

Click New Report to begin generating your first report.
Upon selecting New Report, you will be prompted to select a report type from the left panel. Clicking on the name of a report type will give a preview of the report. While a report is selected, click Create on the far-right side to generate the new report.

Filtering and Sorting Reports
When the report generates, the results of your query will appear. A key feature of Reporting is the ability to actively add new filters and result columns to your report. To add a new filter, click Add Filter and select from one of the available parameters. Your newly selected parameter will appear next to Applied Filters - just below the Add Filter button. To remove an added filter, click the X next to the Applied Filter name.

To add an additional report column, click the Add Column drop-down and select the additional criteria you would like to see returned in your report. The new column will appear to the far-right of your results. To remove a column, hover over the column name and click on the pencil icon that appears next to it. Select Remove Column to remove it from the report. To change the order of the columns, simply grab the scrubber that appears to the left of the column name when hovering and drag it to the desired location.
The sorting and grouping of reports can be done instantly. Clicking on a column name will sort the results by that criteria. Clicking again will sort those same results in reverse order. The grouping of reports can be changed by hovering over the desired grouping column, clicking the pencil icon and selecting Group By Column.
In the Options menu in the top-right of the reporting screen, you can either Export to CSV or view the results Full Screen.
Saving Reports
To save your custom report for future use, click the Save Report button at the top of the reporting screen. Give the report a Title, Description (if desired), and enter any users with whom you wish to share the report. If reports shared to other users should allow those users to modify the report, under the Permissions section select the Read and write radio button; if reports should not be modified by other users, select Read only. Click Save to save the report.

